Wednesday, October 11, 2017

English Paper Piecing the Hexagon


Sorry to say, that I've let this blog just hang out here with no attention from me. 

Let's get updated with a post on English Paper Piecing, or EPP for short. I have fallen in love with the technique over the past year and I can finally use my collection of small scrap fabrics. I really enjoy the hand stitching and the ability to take this project on the go. 

Believe me when I say that there are SO many blog posts on EPP and each person has their own technique and style. I hope to offer you an in-depth look at look at trying this technique, my progress with building the quilt top and some thoughts along the way.

So, I thought I would offer you an up close look at making your first hexagon from start to finish. I've already gotten pretty far in my attempt, but I'm no where finished and I am still learning with each step I take. 

Supplies you will need:

Thread-thin polyester thread in a color that will match your fabrics

Clips-I like Clover clips, however any brand or style of clip would work, even a paper clip.

Needle-Milliners size 11

Paper templates-I use the free templates offered thru a beautiful blog-Texas Freckles

Cotton fabrics-for this tutorial, I've used 100% cotton quilting fabrics. If you are making a hexy flower, you will need 1 fabric and paper piece for the middle and 6 fabric and paper pieces for the sides.

Here's how to get started:
1. Select and cut your fabrics. Leave a seam allowance of 1/4" on all sides of your paper template. You do not need an acrylic template for this, simply trace your paper template directly onto your fabric or pin your template against your fabric and trim it to size. Don't fuss over straight edges or perfect cuts in this step, just be sure to leave at least a 1/4" seam allowance on all sides. Less than 1/4" seam allowance may not hold the stitches firmly in place once the quilt is being assembled and it's difficult to turn under seams that are too short. In some cases, I've left the fabric as a square shape to create my hexagon, and this works just fine, just trim any bulk away after tacking.

2. Place your paper template on the wrong side of the fabric and center it. It may be helpful to pin it in place. Fold one side of the fabric down and place a clip to hold it securely. Decide at this point if you will turn your work to your right or your left, moving clockwise or counter clockwise. Try to keep this consistency thru each hexagon
you make.

3. Once you've folded down one side, fold the next side down to form a neat mitered corner. It may be helpful to hold the corner together as you turn down the second side. Once your corner is formed, pinch it closed and slide the clip up to catch it, or place another clip. This corner will stay clipped while you work around the hexagon, and it will be the last corner you stitch. Making this corner first allows the fabric to sit perfectly in place while you work, guarding against any shifting while stitching your hexagon. 
4. Turn your work clockwise or counter clockwise, I turn mine clockwise and that's how you'll see it here in this tutorial. Make a corner here, just as you did before. Pinch this corner securely with your thumb and forefinger. 

5. With your threaded and knotted needle, slide it up under the edge of your seam allowance going behind your mitered corner fold. Be sure you have not pushed thru your paper template, if so simply pull back and reposition the needle. Push the needle up thru all layers of fabric in the fold, emerging just off to either side of your corner fold. Pull the needle thru and stop just as you feel the knot catch the underside of the fabric. Continue to pinch the corner securely with your fingers. 

6. Hold the needle horizontally, aiming directly at the mitered corner fold. Push your needle slightly down yet towards the area that your first stitch came up thru, catching all the layers of your corner fold. This is called a whipstitch. This stitch stretches across and under your actual folded fabric. Because this is your first stitch in the hexagon, you can do this stitch twice then on your last pass thru, catch the loop with the point of your needed creating a simple knot. Move to your next corner and follow again steps 3-6, however, only your first and last whip stitch should be knotted in place, all others can be a simple loop or catch of the fabric.
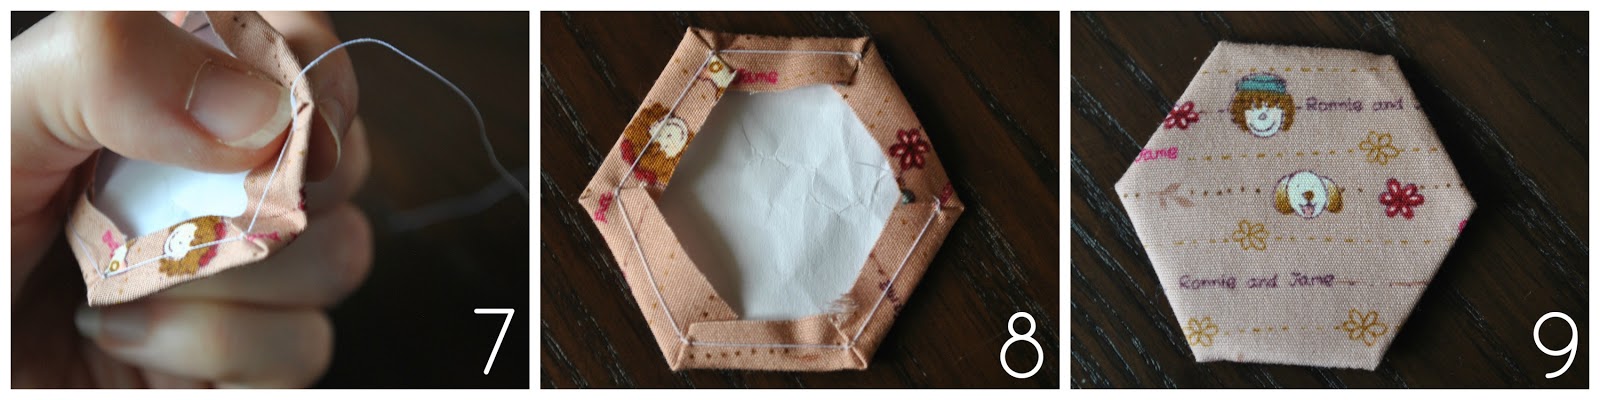
7. As you move from one corner to another, keep your thread taut but not too tight. Picture 7 shows it too taut, warping the fabric and template. Don't be afraid to wiggle things back into place if this happens. Gently loosen your whip stitch, straighten things out and move onto the next corner. As you are folding your fabric down over the edges of the template, make sure to keep the fabric as close as possible to the paper template edges without bending or folding the paper template.

8. When you reach your last corner, the one that is clipped, remove the clip and tack the corner with your last whip stitch and a simple knot. I like to do two stitches in my last corner and on the last stitch I knot the thread by catching the loop and pulling it thru. I insert my needle back down into the fabric, going down and under the seam allowance to leave my thread ends tucked into the seam allowance. Trim your thread to the edge of your seam allowance and admire your first hexagon!

9. This is the right side of the finished hexagon. If you feel the need, you can press this finished piece with a hot dry iron. 

I'll update you with my progress in my next post and we will start to put these hexagons together in my next tutorial. Feel free to comment below and show me your hexagons!


Wednesday, August 28, 2013

Moving on...


So here we go again…rolling with the punches! My last post, I talked about how we are adjusting to homeschooling and my new job. Well, now we’re moving on…quite literally. When we moved to Georgia, we knew it would most likely be a temporary stay. So we opted to rent instead of purchase a home. We signed a 1 year contract on a gorgeous home in a very nice neighborhood. We love it here, but we were just told that our landlord has decided to sell at the end of our contract. So, since my sewing machine and all of my crafty stuff will soon be boxed up, I thought I might go off-track a little here and do a segment on moving and getting organized. The photo above is our living room the day we had our household goods delivered almost 1 year ago. So, I thought, hmmm...I'll bring my blog along for the ride! How about a home tour of the home we are in now, before we say good bye to it? With some organizational things and ideas that I’ve wanted to blog about for awhile. I’ll take you all with me thru the packing, finding the next place, moving and a tour of the next home. Sound fun? :)

Monday, August 19, 2013

I'm still here!!!

I don't even know where to start! I've had step away from the blog for a little while because we've been so busy! I honestly haven't really had the time or energy to get a decent blog post together, let alone any sewing or crafting for the blog. All in the span of a week, my daughter started 9th grade at our local high school then we suddenly transitioned her to the K12 program at home. Without going into too much detail, we confronted some issues with the school about her placement in the classes they offered on her schedule, and there was very little wiggle room for her to make the necessary changes. We were able to not only get her into the classes needed, but add classes not offered at our local school with the K12 program. My son who is in 4th grade this year, started the K12 program on the same day as our daughter. Then, to top it all off, I was offered a part time work from home job with K12 and I started my job training the day after they started school. It was a long week last week for sure, and I'm hoping this week goes a little smoother as we transition.

Here's what our first morning looked like! The morning sun was coming in and the day was low key. The kids attended a few orientations that day and through the week that were presented by teachers and staff for each grade level.


So, I'm hoping that the few of you that are followers are still hanging in there! I haven't forgotten about the blog or tossed it aside, promise! We've just had some surprise transitions to take care of first.

I'll leave you with a photo of my Anna Banana! Here's what she thought of our day...


Thanks for stopping by!


Sunday, August 4, 2013

Homemade laundry detergent!


This has been done 1000 times over on blogs and Pinterest, but I'm posting this here because I've got to get back into making my own laundry detergent!!! After our move to Georgia, I purchased a large container of detergent at the store and got stuck into the habit of buying it again. But, before the move, we were making our own laundry detergent for well over a year, and I absolutely loved it!

There's lots of recipes and methods out there, and believe me, we have tried quite a few of them. Ultimately, I settled on this recipe as a keeper. It's easy to remember, makes a ton of detergent and you easily cut the recipe in half or double it. Sometimes, just to mix things up, I make a dry mix, which is just as easy and effective....and again, makes a lot of detergent!!!

Below you'll find both the liquid recipe and a link to a dry recipe that I use. Either way, making your own laundry detergent will save you money, and time in the end!

Liquid detergent:

5 gal. bucket with a lid (Lowes/Home Depot sell these for about $3)
Large sauce pan (something large enough to hold 5 cups of liquid)
Large spoon
Grater
1 bar of castile soap or laundry soap (Dr. Bronners, Kirks, Zotes, Fels naptha)
1 cup 10 mule Borax
1 cup Arm and Hammer super washing soda (NOT baking soda!)
3 gallons of warm water
3 cups of tap water

**Before you get started, please only use items that you will not use with food preparation after making this detergent. I purchased my measuring cup, sauce pan and spoon from the local thrift and dollar stores, and I use an old grater that I already had and extra of. I store all my supplies in the laundry room when not in use!**


1) Measure 3 gallons worth of warm tap water into your 5 gal. bucket and set to off to the side, preferably on the floor, not the counter top. Mark with a sharpie so you can reference it the next time. It doesn't have to be exact, but close.


2) Fill your sauce pan with 3 cups of water and set on medium heat.

3) Grate your bar of soap. Either a fine or a chunky grate will work, if you don't have a grater, finely chop or shave the soap. My little one is peeking behind at me behind the grater :)


4) When the water in your sauce pan is hot, add in your grated soap. It will begin to melt, but it will take some time. ***Don't let your water boil!!!!*** Keep it at a low simmer. Slowly stir until the soap is fully melted.


5) Add 1 cup of borax to the pot, stir until mostly dissolved. It will be very gritty feeling while stirring! Then, add 1 cup washing soda, stir until mostly dissolved, again, it will feel very gritty. Stir and simmer for another minute or two.


6) CAREFULLY, pour your mixture in the pot into the 3 gallons of water in the bucket. Stir, stir, and stir to fully incorporate your mix. Place the lid on loosely and put your bucket somewhere it can sit undisturbed over night, or at least 12 hours.


The next morning, peek into your bucket! Your soap should look congealed and may possibly have a very thick layer on top. However, it could also look very thin and watery, either way, it's just fine. You can use your spoon to stir up the mix, or if you have an immersion blender, you can give it a wiz.

At this point, you can either use the soap directly from your bucket, using 1/2 cup per full laundry load. Or you can fill empty laundry soap bottles with your soap. Personally, I fill up old empty laundry soap bottles 3/4 full with this soap, then fill the rest of the bottle with water. Give it a shake and it's ready. I use 1/2 cup per full laundry load.

This soap is fine for your HE washer! It is a very LOW sudsing soap.

Remember to shake or stir your soap before each use. It will continue to gel and it may get lumpy between uses.

If you don't want liquid laundry soap, try a dry mix! I use the recipe over at the howdoesshe blog. I believe she originally linked to another source, but that source is no longer working. Again, this makes a whole lot of laundry soap! The dry soap is a great gift as well!

Do you make your own soaps or household cleaning products? If so, what do you make?

Enjoy!


Wednesday, July 31, 2013

A Work in Progress Wednesday...and some thrifty finds!


With today's rainy weather and heavy skies, this is the best shot I could squeeze out of my camera for today's WIP!

Half Moon Modern...one of my favorite lines from Moda! Here is a Layer Cake that's been stitched and cut into a Disappearing 9 Patch quilt top. This came together quickly, with only about 2 hours of sewing, cutting and pressing time. I just bought fabric yesterday for the backing and binding, so I'm hoping to have this up in the Etsy shop by next week. I haven't decided on the quilting yet...so if you've got any suggestions, please let me know!

I thought I'd share a few of my thrifty finds too today! Being a Military family, we move...ALOT...and it's always fun to grab some momentos from the states or countries you've lived in. We've collected Coo Coo clocks from Germany and trinkets and finds from New York, Oregon and Texas. But I haven't really found that 1 idea that really brings them all of our homes together. Pinterest is FULL of fantastic ideas and I may put a few to use...but then I found these at my local Goodwill...


I love them! I'm now on the hunt for Oregon and New York, and maybe one for Germany if there is something similar.  I've seen a few on Ebay, so if I don't find any locally, I'll buy some online. I'm thinking of hanging these in my Dining room.


Some of my other favorite finds are the clamp jar with red and clear hearts around it. A tiny little (lotus dish maybe?) dish that's been hand painted and glued together many times. It holds my rings when I'm doing dishes. And my two little hot plates.

My latest obsession to find while thrifting...Pyrex


Love it!!!

Tuesday, July 30, 2013

Chana Masala


One of my "go to" meals for chickpeas is Chana Masala! Have you tried it before? It's pretty amazing, if you like Indian dishes! 

The first time I wanted to make this, I found so many versions online that I just couldn't decide which to use. In the end, I sort of made a modge podge of two recipes from sources that I reference often and trust. I chose ingredients that I had on hand already, but I did have to buy Garam Masala. Garam Masala is a mixture of peppers, cloves, cinnamon, cumin, coriander and cardamom...it smells amazing and it lends that perfect combination of spices to the dish.

I referenced 
Smitten Kitchen (LOVE that blog!!) for the recipe on Chana Masala, as well as the recipe over at PPK (Post Punk Kitchen), by the amazing Isa Chandra Moskowitz. Click those links to see their recipes for Chana Masala, and while your there, check out the other 100's of awesome recipes available!

Here is my version of Chana Masala:


2 tbsp coconut oil
1 large or 2 small onions, diced
2 clove garlic, minced
2 tsp grated fresh ginger
1 tbsp ground coriander
2 tsp ground cumin
1/2 tsp ground cayenne pepper
1 tsp ground turmeric
juice of 1 lemon
2 tsp paprika
2 or 3 tsp garam masala
1 can 32oz crushed tomatoes
4 cups cooked chickpeas or 2 (15-ounce) cans chickpeas, drained
1/2 tsp salt (or to taste)

First, prepare your beans. If using canned, drain and rinse, then skip to the rest of the recipe. If using dried, cook according to the package directions, then proceed with the recipe. 


In a large skillet over medium heat, add coconut oil. Then, add to the skillet diced onions, garlic and ginger. Saute until lightly browned. Add in all the spices, stir to coat the onions, and cook for another 1 to 2 minutes. Gradually, add in lemon juice, crushed tomatoes and chickpeas. Stir together and reduce heat to a simmer. Simmer for 5 minutes and then taste, adjust spices and or salt according to your desired taste (I added an additional teaspoon of Garam Masala, hence the 2 or 3 teaspoons in the recipe). The sauce should be slightly thick, but if it's too thick for your taste, just add a little water to thin it. 
Serve hot over rice. 

Sure, it's not *exactly* what you would get in an Indian restaurant, but it's close enough for us to enjoy!


Both of the recipes I referenced called for the addition of fresh tomatoes, I didn't have any on hand, but I would like to try it that way when I do.

Also, I went ahead and cooked the whole bag of beans and when they were ready, I only pulled out the 4 cups necessary for the recipe. The left over beans were drained and packed into a container in the fridge. I love to keep plain beans like this on hand for the week. I can make chick pea salad, toss them onto a salad or drop them into a soup. I do the same with black beans and any red beans that may be left over from a recipe.

This recipe makes quite a lot, and it reheats so easily! You could even double it and place portions into the freezer!

Let me know if you make it! I hope you enjoy :)


Sunday, July 28, 2013

Fabric Design Contest!


Have you guys seen this?? I think I might have a design or two to enter....only a few days left, time to get busy!


You can follow the link HERE to get more info and to upload your entries!